

- Read Part 2: The Sovereign Armor / Marisha Ray photoshoot, shop update & what’s next? (Part 2 of 2)
- Animefest guest speaker (in August 2016)
- Having fun n stuff at New York Comic Con 2016 (because I should be allowed to play with this too )
- And more…
As much as I love the fantasy Dreamer Regalia armor/dress I created for actor Felicia Day (click here to see the Geek & Sundry photoshoot), I admit I didn’t know much about armor history or functionality at the time, which raised a lot of interesting discussions.
A lot of people also still think that 3D printing does all the work for you…it doesn’t. Even so, there were debates on whether I actually had to do “real work” since I use 3D printing as part of my process to create intricate and complex pieces. Overall, the Dreamer Regalia received an overwhelmingly positive response and I gained a wonderful experience that taught me a lot.
So, after completing the Dreamer Regalia, my mind was already set on what I could do next. What did I learn? What else can I do to continue to help people understand the possibilities of 3D printing and break through ignorance (and even fear)? How can my work grow and improve? What can I do that’s exciting and meaningful?
(LEFT) Felicia Day’s Dreamer Regalia was my first attempt at making armor. (RIGHT) The Sovereign Armor is my second attempt.
Coming from a background in media studies and marketing, the researcher in me collected and studied thousands of comments and discussions on the Dreamer Regalia armor. I noticed a few interesting trends.
There were many disputes on armor practicality and countless people passive aggressively defining “cosplay” and “fantasy” to each other as an “art where you’re allowed to make up and create whatever you want.” And while I agree that that’s the beauty of fantasy, I’d hate for it to be used as an excuse to shut ourselves away from listening to other ideas and opportunities to learn something new (assuming that it’s a mature and non-hostile discussion…).
There were also many men AND women debating whether the Dreamer Regalia’s chest looked feminine or sexy enough or simply referred to it as an “ugly uni-boob.” So yeah, it was also very breast-focused.
There were also a number of armor enthusiasts who were quick to remind people that breast shaped breastplate armor would kill you in reality. And while I agree, it made me sad to see some use it as an opportunity to reduce anyone who has created impractical fantasy armor to “idiots” instead of finding a way to open up discussion to learn more about medieval armor design and history.
It looked to me like a lot of fantasy armor and historical armor enthusiasts were pretty heated and quick to try to shut the other one up about what female armor “should” look like.
And despite the fact that there are more and more examples where we see women looking awesome in practical armor, there still seems to be an overwhelming belief that fantasy armor that doesn’t have actual breasts just “isn’t sexy,” “isn’t showing off those feminine curves enough” or “doesn’t help people easily identify that she’s a woman.” I know this is just my opinion but how are the below images not badass??
Cate Blanchett as Queen Elizabeth in Elizabeth: The Golden Age, Jamie Chung as Mulan in Once Upon a Time, Gwendoline Christie as Brienne of Tarth in Game of Thrones, Cassandra Pentaghast concept art from Dragon Age: Inquisition (video game)
I admit I’m guilty of drawing breast-shaped breastplates on my female character’s armor since I didn’t know any better. Back then, I didn’t do the research and was mostly influenced by what I saw in film, games, and other fantasy concept artwork. But I was definitely never fond of the bikini armor…I mean, come on…
“Girls and Videogames” artwork by Irene Martini
As someone who started pursuing fantasy art seriously only a few years ago, all these discussions got me wondering how I wanted to grow as an artist. Did I want to throw my interpretation into the mix to help show that a woman can look just as beautiful and sexy in practical looking fantasy armor (that actually covered her body)? Of course.
It became obvious that my next challenge would be to create a practical and versatile Medieval-inspired fantasy armor for a woman.
I didn’t want to simply make an armor that would look nice worn all together. I also wanted the armor to have the versatility for someone to wear certain components independently to create a greater variety of costume/outfit combinations.
For example, the gorget (neck armor) looks completely different and has a lot of unseen detail when it is combined with the breastplate. When worn independently, it looks more like a large collar necklace.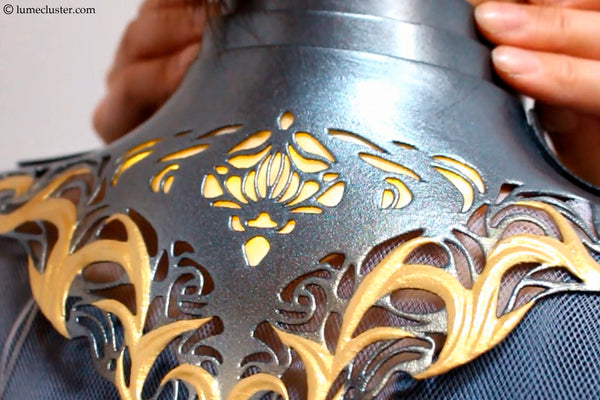
And since the armor is made of a flexible elasto plastic, it will be able to fit a decent range of body shapes and sizes.
So, why is this called the “Sovereign Armor”?
While the Sovereign Armor was originally designed with women in mind, the armor’s message is for everyone.
I made this in honor of the creatives out there who know that, even though it’s empowering to be the ruler of your dreams and creations, you also know how incredibly lonely the journey can often be.
The intricate patterns are meant to look like rolling waves while the fluting is meant to look like ripples. I wanted the glowing LEDs to give the impression of magical and ethereal energy and symbolize the light of the creative.
And the light of the creative is a beautiful and painful thing. Beautiful because it’s what inspires you to create. Painful because it’s always at risk of being snuffed out. When an idea is forming, that creative fire feels unstoppable. But, as we all know, nothing worthwhile ever comes without pain and effort.
Maybe you’ve encountered people who try to douse your flames or complications start getting in your way. Or perhaps the people you once admired are now on a mission to tear you down, dismiss your hard work or make you feel “less than.” It hurts, but if you care about what you create, you’ll keep standing up to fight and constantly re-fuel that fire.
Because it’s yours. All the frustrations, failures, revelations, and successes. Only you truly know the struggle and sacrifices you put into it. Everyone else can only imagine.
It’s easy to critique, judge, and assume. It’s not easy to keep creating the things that can only come from you.


Now, let’s break down the 518 hours that went into completing the 8 pound 3D printed Sovereign Armor (this does not include 3D printing hours)
IMPORTANT: Please do not email, comment or PM me asking for 3D printing material costs, request to have all my mask and armor 3D files, or ask me to teach you how to re-create the 3D model of each of my pieces of artwork. If you have more questions, please refer to my FAQ.
88 HOURS — Researching Medieval armor, experimenting with flexible 3D printing materials, exploring my connection with intricately carved Chinese artwork, and developing new finishing methods
The Sovereign Armor’s extremely flexible (and porous) elasto plastic material is completely different than the Dreamer Regalia (nylon), which meant I had a ton of new things to think about. For instance, I spent a lot of time testing new materials, paints, glow powders, and finishes that would work with the elasto plastic surface. I also felt 10x more obsessive over the little details since this was, once again, a one shot 3D print.
Since my goal was to also make a more practical female armor, I started out with good ol’ Google, but eventually purchased some textbooks, like Techniques Of Medieval Armour Reproduction: The 14th Century by Brian Price and a few other texts to brush up on some medieval history. Since I live in New York, I was also grateful to be able to visit the armor collection at the Metropolitan Museum of Art.
I used the images below (and a lot more) as references while designing the Sovereign Armor.
LEFT: Gothic Armor, late 15th century; extensively restored | TOP THREE: Barbute (ca. 1460), barbute (ca. 1470–80), sallet (ca. 1470–80) | BOTTOM THREE: Sallet (ca. 1510–20), burgonet (ca. 1540), burgonet (1575–1600)
These authentic custom made recreations of a pair of gothic gauntlets were great references for my own gothic-inspired gauntlets. Click through to see more gorgeous images at www.pinterest.com/kohlstruck/gothic-gauntlets
I eventually decided I was most drawn to the 15th century German Gothic armor style and all of its beautiful fluting. I was also in love with the burgonet, sallet, and barbute helmet styles. And even though I had tons of reference images to work with, I still felt like I needed a bit more guidance.
Like my Dreamer Masks and Dreamer Regalia, I once again wanted to blend this with my long love for Chinese carvings. I grew up seeing a lot of Chinese artwork all the time, so I naturally wanted to infuse some more of my Chinese aesthetics to it. While I was more comfortable with my Chinese art sensibilities, I was less knowledgeable when it came to 15th century German Gothic armor.

Chinese carved lacquer, stone, wood, ceramic artwork that I grew up seeing in the Ng family household.
So, I asked medieval armor educator, reenactor, and Youtuber, Ian LaSpina (aka Knyght Errant), if he would be willing to be my armor consultant (after I watched and re-watched every single one of his videos…o_o)
As an avid fan of both fantasy and historical armor, he could see the best of both worlds. You can get a glimpse of his content in the playlist below:
Knyght Errant’s Youtube channel and website offers easily digestible content that explores medieval history, armor, armor maintenance, and various types of armor attire and undergarments. His channel and website are an amazing source of inspiration and knowledge that’s perfect for the complete medieval armor beginner, cosplayer, costume maker, and anyone interested in getting an intro to historical armor design and expanding their visual library.
Ian was kind enough to review my design progress every step of the way through Sketchfab’s 3D viewer to ensure I didn’t make any impractical armor components that might inhibit the wearer’s movement or…y’know…end up harming the wearer instead, haha (I’m looking at you, dangerously spiky pauldrons!! :P)
After cramming a ton of new information in my head, I spent some time applying what I learned by trying to identify armor and its components at the MET. I also looked back at my old fantasy books/novels and armor Pinterest boards and wow… I mean, I knew there were clearly problems with the really ridiculous sets of female fantasy armor, but even the less impractical-looking ones looked seriously problematic (in both men and women’s fantasy armor). I felt ready to finally put myself to the test…
20 HOURS — Sketching and getting body measurements (no 3D scans were used)
I got all the necessary measurements by following these diagrams from Techniques Of Medieval Armour Reproduction: The 14th Century by Brian Price.
I was like, “Hm. I could get a 3D scan…but do I want to try and 3D model and print some armor without using a 3D scan instead? ….SURE, WHY NOT.” So, using the diagram above as a guide, I used a tape measure and homemade calipers to take my own body measurements.
I won’t lie. It was a challenge to keep myself from accidentally letting a reference influence my design too much. Eventually, I was able to pull together a very simple sketch that looked good enough.
5 HOURS — Creating a 3D model based on my body measurements (no 3D scans were used)
Instead of modeling my figure from scratch, I wanted to save time by using this program I already had called Design Doll, which allows you to easily customize a figure to any specifications. So, I adjusted the Design Doll figure to match the reference photos of the front, back, and side of my body.
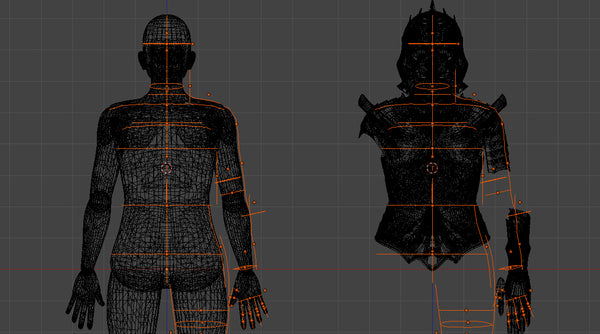
The left model was imported from Design Doll and into Blender. Model was adjusted to match my body measurements..
Then I imported the model into Blender and fine tuned it with my body measurements. I’m a pretty average size and weight (5’4″, 128 lbs), so this armor would have no trouble fitting someone similar to my size or slimmer than me since the armor would be able to flex and bend around the body.
43 HOURS — Modeling the base armor design (91 total pieces)
The biggest challenge was modeling the gauntlets and figuring out how the pieces would articulate and fit together. The second toughest was modeling the helmet. I had to go through many iterations before I was satisfied with a design that made sense with the rest of the armor. The third toughest was probably the fauld (the armor pieces below the waist) and pauldrons since they were also articulated.
By the time I finished modeling all the base armor components, I realized it was made up of 91 individual pieces that would need to be assembled into a total of 15 armor components. The Dreamer Regalia, on the other hand, was made up of a total of 6 pieces that required absolutely no assembly.
9 HOURS — Drawing the intricate armor patterns
I took screenshots of each armor component in Blender’s orthographic view and printed them out on sheets of paper that I could draw on. No matter what, I still always find joy in drawing by hand with a nice, even flowing pen.
I decided where I wanted to place my intricate patterns based on where I wanted LEDs to shine through. I wanted the armor design to give off the feeling that the wearer was filled with magical energy without overdoing it.
Although you probably can’t see it, the pattern also outlines the embossed details.
23 HOURS — Modeling the intricate details into the armor
This is the easy part and the step I find most therapeutic. Turns out the Sovereign Armor is also my first symmetrical piece, so that made it a little breezier. All I had to do was load up my pattern drawings as background images into Blender and then modeled out all the intricate details along the base armor design I had previously created. I also made a Sovereign Staff to go along with the armor.
As I’ve shared many times, I rely pretty heavily on Blender’s shrinkwrap modifier, followed with the solidify and subdivision surface modifiers, plus jumping into sculpting mode every now and then (but not very often). If you want to get a sense of how I model, you can see timelapses below that I recorded for Felicia Day’s Dreamer Regalia.
My final and favorite part was when I brought out the extra little details like the embossing and other small sculptural elements.
17 HOURS — Getting the design 3D print-ready with thickness checks and other troubleshooting
I didn’t want to rush through this part. Other than dividing up the armor into smaller groups (that would fit the print bed), checking for non-manifolds and thin structures, this step is largely comprised of me asking myself over and over again, “Do I really like this design? Am I truly satisfied with it? Is there anything I half-assed or muddled through that I could do better?”
If I can’t come up with a response to any those questions, then I’m good to send it off to the printers.
20 HOURS — Rendering a simple preview of the armor as a painting reference
I rendered the color and LEDs to give myself an idea of what the final piece would look like while I was waiting for them to finish printing
My goal was to hopefully make the 3D print look better than this quick render.
While Blender was rendering the image, I actually spent all these hours researching color schemes (thanks The Replica Prop Forum folks for your input!), fabric, foam, and basically figuring out every other task that I would have to take care of once my armor was finished printing.
For armor color, I decided I wanted to go with an icy silver/blue with splashes of gold to go with the warm white LEDs.
15 HOURS — Cleaning and gluing
Elasto plastic 3D prints being taken out and cleaned.
I had to wear a mask when handling the fresh elasto plastic 3D prints. Although the prints were pretty clean, I could still feel a lot of dusty, rubbery particles everywhere. I did not want to risk breathing it all into my lungs. Before I could do anything, I cleaned up all the armor pieces with a surface cleaner, which removed most of the particles.
Once the cleaner dried, it was time to glue. The backplate, plackart, helmet, and largest lame (the pieces that make up the fauld) on the front fauld piece had to be split in two while the breastplate had to be split into four pieces in order for it to be printed.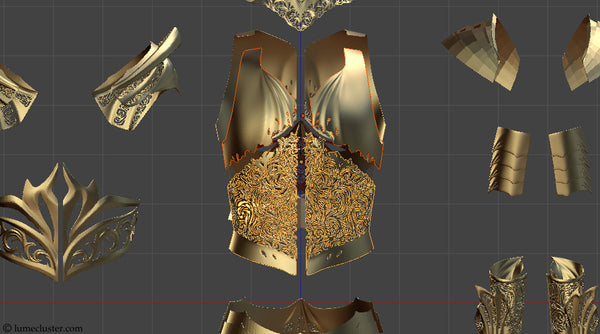
So, putting them together was not fun since elasto plastic is pretty floppy when it’s unfinished. With a lot of carefully placed E6000 glue, it all came together without too much trouble.
12 HOURS — Sealing the armor components (multiple layers)
Elasto plastic is extremely porous and does not have a smooth surface. Let’s just say, if you went straight to painting without prepping and sanding properly, you’d probably have armor that would look more like fuzzy felt rather than metal. NOT PRETTY.
So, to deal with that, I sealed every single component with matte varnish, which is very flexible, levels well, and also sands easily and smoothly. While a varnish spray could’ve sped things up, it was too thin, which is why I opted to apply it by hand. What I like about doing this is that it gave the elasto plastic pieces a little more rigidity without eliminating its flexibility.
81 HOURS — Sanding, more cleaning, and making the surface paint-ready
From my experience, directly sanding elasto plastic isn’t all that great since it’s kind of rubbery. It was also a pain because my armor was designed to the thinnest (and safest) possible thickness of 1.1 mm, so I couldn’t risk sanding it too heavily.
Some prints came out with little to no print steps/lines. A few other prints, on the other hand, had severe lines that popped out very visibly…like on the mask. I’d say the ugly print line was about 1 cm wide and popped up on the mask maybe 1.2 mm, which effectively made the mask look like it had giant stripes across its face.
To fix this problem, I applied a few layers of matte varnish on all components and several more layers on major problem areas. I could get away with cleaning up intricate details with my Dremel, but the large surfaces needed to be hand sanded. Keep in mind that elasto plastic is quite a soft material (and mine was already very thin), which meant I had to be careful not to overdue the sanding or accidentally sand out some of the crease details and fluting.
Once the sanding was out of the way, I used a surface cleaner again and re-applied another few layers of varnish. Afterwards, I sprayed a bit of Bulldog adhesion promoter on all the surfaces just in case.
24 HOURS — Painting the basecoat (hand painted)
I had a good experience with leather paints on elasto plastic because it didn’t crack even after a lot of bending and flexing in cold/hot temperatures. If there was cracking, it was usually because the surface wasn’t prepped well, which could be remedied with some adhesion promoter.
I needed to paint on 2-3 thick layers, which is why I decided to hand paint the black leather paint. The great thing about leather paint is that it also levels really nicely, so you don’t really see any brush strokes.
25 HOURS — Airbrushing
I first airbrushed a decent amount of bronze leather paint, followed by a layer of pewter mixed with a few drops of light blue. The final color was a mixture of silver and a very tiny amount of blue turquoise leather paint, which brightened it up nicely.
15 HOURS — Hand painting gold embossed details
I probably went over the embossed details 3-4 times with gold leather paint on the breastplate, vambraces, helmet, mask/visor, and gorget.
6 HOURS — Sealing the armor
I sprayed several layers of gloss varnish on the inside of the armor with enough time to dry between coats, of course. I then hand painted several layers of gloss varnish on the outside of the armor.
115 HOURS — Creating multiple layered lining, LED placement, and connecting armor components
The armor had a busy traveling schedule ahead of it and I was running out of time. So, I had to enlist my sister’s help (Fiona Ng aka DarthAsterisk) for a lot of this portion. As an art toy designer (she also makes armored beauties!), she already knew how to handle a lot of the tools (and pressure) and probably kept me from losing my sanity as we watched many sunrises and sunsets together. There are five layers that make up the glowing parts of the armor:
- Thin sheet of plastic
- Gold satin cloth
- 2-5 layers of foam (1/16 inch thick)
- Fairy light LEDs
- Canvas
The plastic made the satin gold cloth have a nice matching shine similar to the gloss varnished armor. I wanted the armor to also look good when the LEDs are off and the plastic over the gold satin looked pretty decent. The thin layers of foam helped diffuse the LEDs and the canvas made it a little more comfortable for the wearer.
I chose thin fairy light LEDs mainly because of time, it was simple, and it wouldn’t add too much extra bulk since the armor is well-fitted.
When it came to connecting all the armor components, I decided it would be safer not to rivet the soft plastic and went with E6000 glue instead.
Ian LaSpina (aka Knyght Errant) provided reference images from his own custom made armor to help me understand how to articulate parts of the armor like the fauld. Learn more at www.knyghterrant.com
Most of the articulated parts (like the pauldrons, rerebraces, and faulds) were attached with pieces of thick canvas. After all, I wanted the wearer to be able sit properly and move their arms and shoulders.
And if you’re reading this because you want to find out how I made the articulated gauntlets, I wish I could share some shortcut, but I do not know a faster way other than studying armor. 
I suggest studying actual historical armor references (do not simply Google armor because you’ll find many inaccurate replicas) or visit places like The Metropolitan Museum of Art if possible. The MET website has a vast resource of great images and sites like Knyght Errant’s Youtube and website are also an amazing place to start understanding the history, design, purpose, and function of medieval armor.
Even if you don’t make masks or armor, there’s always something to learn that could take your work to the next level. No matter what it is you do or create, I truly believe that the moment we believe we “know enough” is when we fail and stop growing.
I mean, I know there’s still so much I can learn about armor. But after taking even just a little time to study and understand how medieval armor has evolved and how it’s made, coming up with another design was 10x easier (than when I was creating the Dreamer Regalia) when I understood each armor component’s purpose and function. And when I was just starting out with my masks, I learned so much in communities I never expected to dive into, like The Replica Prop Forum, cosplay sites, and LARP groups.
I also know I’ve only recently started familiarizing myself with the cosplay community. But after studying up a bit on armor, it got me wondering how awesome it could be to see more cosplayers transform some of their favorite female character’s (impractical) armor designs into something more functional. It could add a whole lot more fun varieties to the cosplay mix. Sort of like when people started envisioning more historically accurate Disney princesses or like artist Claire Hummel’s (aka shoomlah) inspiring princess interpretations.
I believe it’s important to always stay hungry to learn and expand your mind. It’s always a plus to do extra research and develop a better perspective and a more informed design. You’ll be surprised by what you are capable of when you open yourself up to learn beyond your comfort zone.
As always, thanks for reading. I can’t wait to show you what Geek & Sundry has in store for this armor, so stay tuned!
<3 Melissa