This was commissioned by Marvel and it is also my own interpretation of the character’s headdress so please do not ask me to give you my 3D files. This is also a look into my process and NOT a how-to.
When Marvel first asked me if I could re-create Hela’s headdress for another Marvel Becoming episode, I was skeptical. Not because I couldn’t do it but because Hela was already turning out to be a huge fan favorite right after the first Thor: Ragnarok trailer was released.
Cate Blanchett as Hela in Thor: Ragnarok. Original Hela headdress was created by Ironhead Studio.
As you know, I’m not a cosplayer nor do I make prop replicas. If I take on any kind of commission that is based on pre-existing IP, it’s because I’ve been given permission to offer my own spin on it while still honoring as much of the original design as possible. And while the thought of sharing my own take on Hela was exciting, I was also feeling a bit nervous.
Just like my Ironheart interpretation for a previous episode of Marvel Becoming, I was also concerned about how well viewers would receive my take on Hela’s headdress.
Producer: Judy Stephens
Director and Director of Photography: Jason Latorre
Cosplay by: Dial C Costumes
Headdress: Melissa Ng / Lumecluser
Cosplayer: Jessica Dru Johnson
Makeup: Miya Tamlyn
Hair: Chrissy Lynn Kyle
Editor: Michael Arginsky
Opening Title Animation: Nick Proto
Photo Editor: Paolo de Leon
PA: Armen Aghaeiana and Eric Bakktanian
Stage Manager: Ryan Carbrey
If you’ve been following Lumecluster for a while, you’ll know that I mostly make my own original creations, as you can see in some examples below. It’s very rare that I make anything based on a pre-existing IP.
Lumecluster Dreamer Masks

Lumecluster Sovereign Armor
Why? Because building things from my own imagination is easier than building off of someone else’s. There’s still pressure when coming up with original designs that both viewers and I will enjoy, but when it’s based off of a pre-existing IP, there seems to be a lot less room for you to make mistakes or alterations that fans will be happy with. That’s fandom for you I guess, haha.
I also didn’t want to disrespect Ironhead Studio’s original Hela headdress (this link is a Tested.com interview with Ironhead Studio founder Jose Fernandez where he shares how they made Hela’s headdress), which was already beyond gorgeous. Mind you, Hela’s headdress in the trailers looked mostly CG and didn’t appear nearly as beautifully detailed (and the color!) as the original, real life headdress.
Hela’s headdress was also a rather sudden request, which was a challenge to fit in between my other work. It was moments like this that I was really glad I do a lot of 3D printing.
On top of the limited time frame, there were a few challenges. The headdress needed to be:
- Custom fitted to model, Jessica Dru Johnson
- Slightly reduced scale
- Lightweight and well-balanced
- Able to be easily transported in a carry-on suitcase
- Detachable antlers
- Semi-rigid and impact resistant

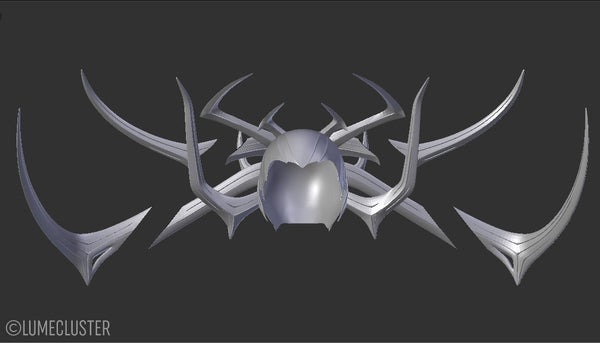
Hela headdress front view and matcap 3D model preview
Hela headdress back view
I also really wanted to make her antlers glow but, unfortunately, I could not stray too far from the original design like I could with Ironheart. Someday, I will fill the antlers with an eerie glow! Someday!
When it came to crafting Hela’s headdress, I didn’t have to do much research other than to refer to the references Marvel provided from Ironhead Studio, which made it a bit easier to decide what I would want to alter.
First, before I could get to modeling the actual headdress, I had to first scan Jessica’s head bust to ensure my model would fit properly once it was 3D printed.
I used a process called photogrammetry to get the scan you see below. All this requires is your trusty camera, a tripod, and enough space for you to circle around the object. I then uploaded my photos into a program called 3DF Zephyr (I used the free version), which quickly reconstructs 3D models from photos.
Head bust of Jesdru (LEFT) and 3D scan (RIGHT) via photogrammetry
After cleaning up the 3D scan, I went straight to 3D modeling my concept and used Hela’s suit in the film trailer as inspiration for the added details.
Ironhead Studio’s original Hela headdress design had antlers that had a smooth surface, but I wanted the antlers to have patterns that matched the ones detailed on her suit. I wanted the patterns to be visible without being overwhelming.
Hela headdress added detail closeup
The headdress as a whole needed to be broken into detachable smaller pieces to be able to fit in an overhead carry-on suitcase (and be made within the limited timeframe).
Hela headdress detachable antlers preview
If you look carefully, you’ll see I added subtle inset details, which are actually the removable antlers. I wanted to blend the insets and embossed details into the overall design and not make any drastic changes to the headdress design…but just enough.
And can you believe my interpretation of Hela’s headdress was actually REDUCED in size??
The Hela headdress had to be scaled down due to timeframe
What you sadly don’t get to see is just how beautifully angled and complex the antlers actually are, which are not as cylindrical as I thought they were.
What I loved most was the top view, which made the headdress look like a spider. It’s too bad you don’t get to see that in the Marvel Becoming video. It’s amazing how the antlers look like they’re reaching out towards you but you wouldn’t know that if all you could see was a front/back view.
I also made the antlers much sharper and blade-like, which I should have been more careful about since Marvel’s Judith Stevens had to go through TSA with it… Thankfully, they made it through without a hitch!
Various preview angles of Hela’s headdress before 3D printing
Once I got Marvel’s OK on my version of Hela’s headdress, it was off to 3D printing!
Unlike Ironheart, which was 3D printed using my Taz 6 and Form 2 printers, Hela’s headdress was printed entirely on the Taz 6 because of its scale and the limited time I had.
For the material, I printed on my Taz 6 using Taulman 3D’s PCTPE, which is a ‘plasticized copolyamide TPE” or a chemical co-polymer of highly flexible, semi-rigid nylon and thermoplastic elastomer (TPE). Whew, what a mouthful.
While PCTPE is flexible, it doesn’t lose its rigidity, which was perfect for keeping the headdress safe from breakage or losing its shape.
3D printing half of the Hela headdress base on the Taz 6 using PCTPE filament
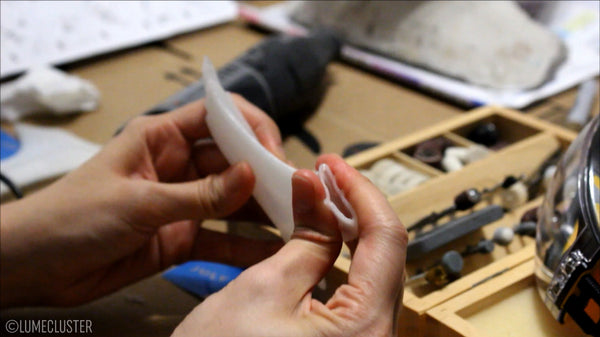
Testing the flexibility and strength of one of the hollow 3D printed PCTPE antlers. In other words, I squished it and smacked it on the floor a bunch of times
And because PCTPE is flexible and strong, I was able to 3D print all the antlers hollow, which made it very durable and lightweight. For example, if someone were to slam into the antlers, they wouldn’t snap or break. I even dropped it (totally by accident) and the entire headdress was fine. The only thing that might be scratched is the paint finish.
Tip about PCTPE if you decide to use it. Instead of using an Elmer’s glue stick, I prefer pouring on the actual Elmer’s glue and using a spreader to put down a nice, thicker layer (no thicker than a business card though!). Nylon doesn’t really like to stick to the build plate so the thicker spread of Elmer’s glue really helped it adhere nicely. It also peeled off beautifully without leaving much residue on the build plate.
Removing half of the Hela headdress base from the build plate
Antlers had to be printed in segments
As I described in my Ironheart article, PCTPE is a bit tougher and normal Dremel sanding bands and grinders couldn’t really cut neatly through the material.
The only thing that worked really well (and efficiently…time is everything!) for me were large diamond coated rotary burrs, which could cut through PCTPE like butter. This saved me a ton of time when it came to cleaning up the details since PCTPE doesn’t print as sharp or clean as other filaments like nGen.
Even though diamond coated rotary burrs sped things up, it was still time consuming since there were so many antlers…
Cleaning up some of the details using diamond coated rotary burrs
Smoothing out some of the more prominent print lines before priming
It’s so satisfying when all the pieces start coming together, especially when the cap slipped perfectly onto Jessica’s head bust.
Again, since PCTPE is semi-rigid, it made fitting the cap a lot easier and probably more comfortable for the wearer.
I also spent some time cleaning up the pieces to ensure a smooth and tight fit between the headdress and the removable antlers.

The Hela headdress cap was also 3D printed in flexible PCTPE
Test fitting the detachable antlers
After a lot more dremeling, I filled problem spots with some flexible filler, sanded, and primed the entire headdress with a high build flexible primer.
And then it was sanding time.
Priming the Hela headdress base halves
And more sanding.
Aaand more sanding.
There was a lot of sanding.
Taking a break
Finally, it was assembly time!
I had to combine the two antler base halves together before I could plant the antler base on the back of the headdress cap.

Of course, the detachable antlers were set aside before securing the antler base to the headdress cap
Attaching the antler base to the cap
Attaching the antlers to the cap
WRONG. DO NOT DO THIS :P
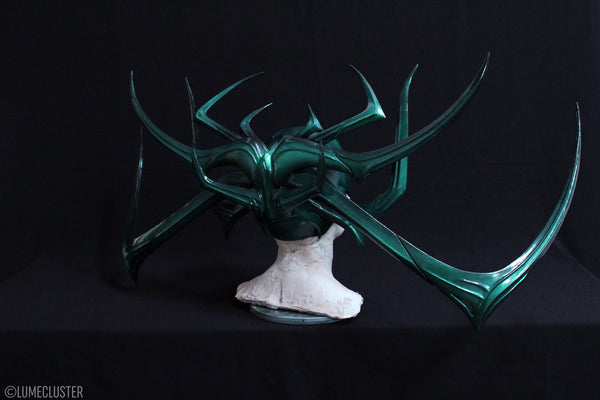
Finally, it was time to airbrush the pearlescent colors.
I was really surprised when I saw Ironhead Studio’s photos of their Hela headdress. In the trailers, you get the impression that her CG antlers are simply black when the real headdress actually had a swirly / shifting mix of pearlescent malachite and black color throughout the antlers.
But since I added all these line details, it didn’t seem like a good idea to try and recreate the swirls since it looked like they’d clash or look too busy.
The final and most satisfying step was sealing the entire piece!
I honestly had a lot of fun sharing my own spin on Hela’s headdress. It was also a great challenge to see how I could re-imagine an already gorgeous piece.
Overall, I hope viewers enjoy this as much as I enjoyed creating it.
I still want to put some LEDs in there though… Enjoy some more pictures below!
<3 Melissa
P.S. Stay tuned! I swear I’ve had other designs in the works. I prefer quality over quantity and I’m sure you’ll love what I have coming up later this year.


