Blog
New Reflective Phoenix Face Masks, Gauntlet Fingerless Gloves & Pins June 17, 2020 16:00

Subscribers are first to hear about new designs, specials and limited pre-orders. Sign up for the free newsletter.
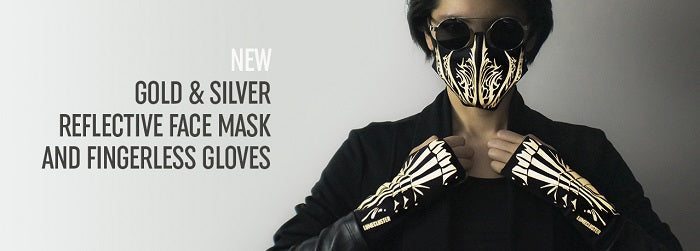
New *reflective* phoenix face mask & gauntlet fingerless gloves are available in the Lumecluster Shop.
No matter what the activity, task, event, or weather is, you can always be prepared with some light armor. These designs are made of eco-friendly recycled fabric, contributes to a good cause, helps you protect those around you by masking up, and also make you look badass. Check them out here.
I also wanted to share some important changes at Lumecluster. I felt the need to remind people that my designs have always been built on the idea that we should ALL have the freedom to fight for our dreams. And I love creating art that can make you feel like knights or heroes of change.
Because that’s what heroes do, isn’t it? Make change & uplift others to make the world a better place for all people. Not just for some. But the reality is that not all of us have the equal freedoms, resources or privileges to do so.
“We shouldn’t have to have the exact same identities to be concerned about others.” -Raquel Willis
CLICK HERE TO GO THE LUMECLUSTER SHOP.


From here on out, all existing and future Lumecluster designs will contribute to change and fighting for justice.
With each purchase, you can look badass & also know you are contributing to the ongoing fight for liberation for all by uplifting our most marginalized communities, through our support of the Transgender Law Center. I will be adding more organizations in the future as the design collections grow.
“The Trans Agenda centers the lives and voices of trans people of color, who have too often had to advance our collective liberation from the margins. Trans justice is migrant justice, disability justice, racial justice, environmental justice, reproductive justice, economic justice, and gender justice. An agenda for trans liberation is a blueprint for liberation for all.” –Transgender Law Center
Reflective pattern was created by Fiona Ng Designs and is inspired by my Modular Phoenix Gauntlet & Diadem designs. Face mask & gloves are in collaboration with Wing & Weft Gloves, the last glove factory in New York City’s Garment Center. They’ve produced gloves for half a century and made gloves for First Ladies and celebrities like Lady Gaga and Prince. I love them and their mission to preserve & nurture craftsmanship in NYC!
[LEFT} Phoenix face mask and gauntlet fingerless gloves. [RIGHT] Modular Phoenix Gauntlet and Diadem used as inspiration for the armor apparel items.
And in case you missed it:
<3 Melissa
P.S. So...you missed the past Phoenix Gauntlet (Tiers 1-3) pre-orders. Will it ever happen again?
Short answer is "maybe." We underestimated the intensive labor the last time we did pre-orders, and it was emotionally and physically brutal for a two person team. Even if we were to hire extra help, we were seriously undercharging for the amount of work that was required and will need to make necessary adjustments to stay functional. I'll do another update about this in the future when I gather myself, but there are a lot of changes happening right now.
Overall, we care about keeping everything Lumecluster-made right here in New York and we thank you for your understanding and patience as we make the important changes that will help us make more beautiful armor while retaining our health and sanity :/
Get special DesignerCon creations and pricing on Cyber Monday only December 2, 2019 00:00

Several new figures and jewelry designs were revealed at DesignerCon last month. Some asked if I was going to sell them online and I decided to offer DesignerCon pricing today (12/2/19 12:00AM EST) on Cyber Monday ONLY (shipping not included).
Special DesignerCon Item pricing ranges from $15 -$100.
After Cyber Monday, the special DesignerCon pricing will no longer be available and the price will increase.
In a recent blog post, I announced that I partnered with Fiona Ng Designs to help me produce and ship small hand sculpted and resin cast sculptures since that’s her specialty. She is helping me translate many of my large designs into a unique variety of smaller creations.
The hand sculpted and resin cast sculptures and jewelry can be found on Fiona Ng Designs while the metal jewelry pieces are found on the Lumecluster Shop.
<3 Melissa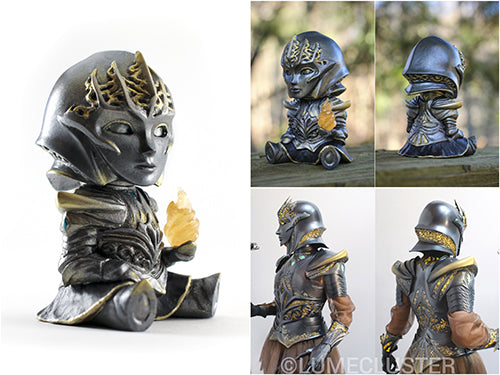
Lumecluster Sovereign Armor Mini

Lumecluster Dreamer Mask Breakthrough Mini

Lumecluster Dreamer Pendant

Lumecluster Resilience Pendant
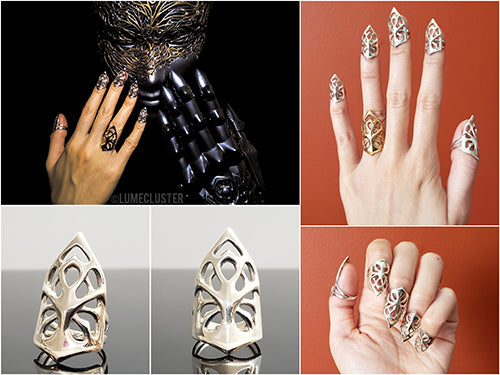
Lumecluster Phoenix Claw Rings
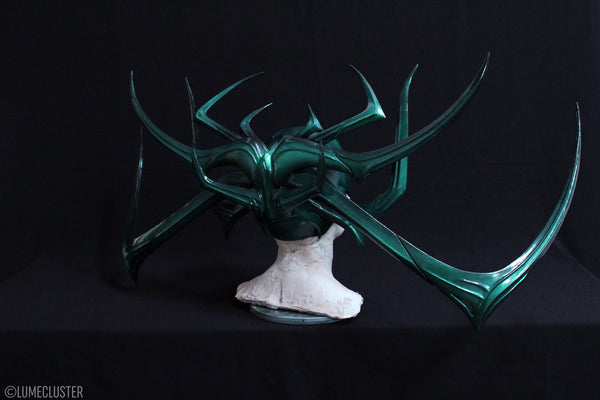
Making my interpretation of Hela’s headdress from Thor: Ragnarok March 30, 2018 09:00

This was commissioned by Marvel and it is also my own interpretation of the character’s headdress so please do not ask me to give you my 3D files. This is also a look into my process and NOT a how-to.
When Marvel first asked me if I could re-create Hela’s headdress for another Marvel Becoming episode, I was skeptical. Not because I couldn’t do it but because Hela was already turning out to be a huge fan favorite right after the first Thor: Ragnarok trailer was released.
Cate Blanchett as Hela in Thor: Ragnarok. Original Hela headdress was created by Ironhead Studio.
As you know, I’m not a cosplayer nor do I make prop replicas. If I take on any kind of commission that is based on pre-existing IP, it’s because I’ve been given permission to offer my own spin on it while still honoring as much of the original design as possible. And while the thought of sharing my own take on Hela was exciting, I was also feeling a bit nervous.
Just like my Ironheart interpretation for a previous episode of Marvel Becoming, I was also concerned about how well viewers would receive my take on Hela’s headdress.
Producer: Judy Stephens
Director and Director of Photography: Jason Latorre
Cosplay by: Dial C Costumes
Headdress: Melissa Ng / Lumecluser
Cosplayer: Jessica Dru Johnson
Makeup: Miya Tamlyn
Hair: Chrissy Lynn Kyle
Editor: Michael Arginsky
Opening Title Animation: Nick Proto
Photo Editor: Paolo de Leon
PA: Armen Aghaeiana and Eric Bakktanian
Stage Manager: Ryan Carbrey
If you’ve been following Lumecluster for a while, you’ll know that I mostly make my own original creations, as you can see in some examples below. It’s very rare that I make anything based on a pre-existing IP.
Lumecluster Dreamer Masks

Lumecluster Sovereign Armor
Why? Because building things from my own imagination is easier than building off of someone else’s. There’s still pressure when coming up with original designs that both viewers and I will enjoy, but when it’s based off of a pre-existing IP, there seems to be a lot less room for you to make mistakes or alterations that fans will be happy with. That’s fandom for you I guess, haha.
I also didn’t want to disrespect Ironhead Studio’s original Hela headdress (this link is a Tested.com interview with Ironhead Studio founder Jose Fernandez where he shares how they made Hela’s headdress), which was already beyond gorgeous. Mind you, Hela’s headdress in the trailers looked mostly CG and didn’t appear nearly as beautifully detailed (and the color!) as the original, real life headdress.
Hela’s headdress was also a rather sudden request, which was a challenge to fit in between my other work. It was moments like this that I was really glad I do a lot of 3D printing.
On top of the limited time frame, there were a few challenges. The headdress needed to be:
- Custom fitted to model, Jessica Dru Johnson
- Slightly reduced scale
- Lightweight and well-balanced
- Able to be easily transported in a carry-on suitcase
- Detachable antlers
- Semi-rigid and impact resistant

Hela headdress front view and matcap 3D model preview
Hela headdress back view
I also really wanted to make her antlers glow but, unfortunately, I could not stray too far from the original design like I could with Ironheart. Someday, I will fill the antlers with an eerie glow! Someday!
When it came to crafting Hela’s headdress, I didn’t have to do much research other than to refer to the references Marvel provided from Ironhead Studio, which made it a bit easier to decide what I would want to alter.
First, before I could get to modeling the actual headdress, I had to first scan Jessica’s head bust to ensure my model would fit properly once it was 3D printed.
I used a process called photogrammetry to get the scan you see below. All this requires is your trusty camera, a tripod, and enough space for you to circle around the object. I then uploaded my photos into a program called 3DF Zephyr (I used the free version), which quickly reconstructs 3D models from photos.
Head bust of Jesdru (LEFT) and 3D scan (RIGHT) via photogrammetry
After cleaning up the 3D scan, I went straight to 3D modeling my concept and used Hela’s suit in the film trailer as inspiration for the added details.
Ironhead Studio’s original Hela headdress design had antlers that had a smooth surface, but I wanted the antlers to have patterns that matched the ones detailed on her suit. I wanted the patterns to be visible without being overwhelming.
Hela headdress added detail closeup
The headdress as a whole needed to be broken into detachable smaller pieces to be able to fit in an overhead carry-on suitcase (and be made within the limited timeframe).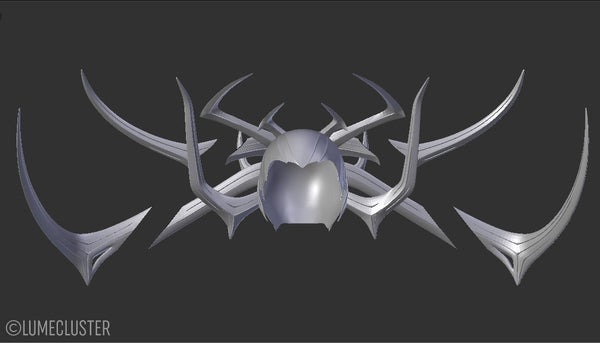
Hela headdress detachable antlers preview
If you look carefully, you’ll see I added subtle inset details, which are actually the removable antlers. I wanted to blend the insets and embossed details into the overall design and not make any drastic changes to the headdress design…but just enough.
And can you believe my interpretation of Hela’s headdress was actually REDUCED in size??
The Hela headdress had to be scaled down due to timeframe
What you sadly don’t get to see is just how beautifully angled and complex the antlers actually are, which are not as cylindrical as I thought they were.
What I loved most was the top view, which made the headdress look like a spider. It’s too bad you don’t get to see that in the Marvel Becoming video. It’s amazing how the antlers look like they’re reaching out towards you but you wouldn’t know that if all you could see was a front/back view.
I also made the antlers much sharper and blade-like, which I should have been more careful about since Marvel’s Judith Stevens had to go through TSA with it… Thankfully, they made it through without a hitch!
Various preview angles of Hela’s headdress before 3D printing
Once I got Marvel’s OK on my version of Hela’s headdress, it was off to 3D printing!
Unlike Ironheart, which was 3D printed using my Taz 6 and Form 2 printers, Hela’s headdress was printed entirely on the Taz 6 because of its scale and the limited time I had.
For the material, I printed on my Taz 6 using Taulman 3D’s PCTPE, which is a ‘plasticized copolyamide TPE” or a chemical co-polymer of highly flexible, semi-rigid nylon and thermoplastic elastomer (TPE). Whew, what a mouthful.
While PCTPE is flexible, it doesn’t lose its rigidity, which was perfect for keeping the headdress safe from breakage or losing its shape.
3D printing half of the Hela headdress base on the Taz 6 using PCTPE filament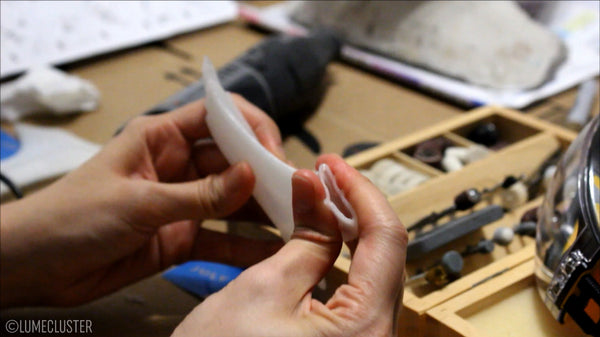
Testing the flexibility and strength of one of the hollow 3D printed PCTPE antlers. In other words, I squished it and smacked it on the floor a bunch of times
And because PCTPE is flexible and strong, I was able to 3D print all the antlers hollow, which made it very durable and lightweight. For example, if someone were to slam into the antlers, they wouldn’t snap or break. I even dropped it (totally by accident) and the entire headdress was fine. The only thing that might be scratched is the paint finish.
Tip about PCTPE if you decide to use it. Instead of using an Elmer’s glue stick, I prefer pouring on the actual Elmer’s glue and using a spreader to put down a nice, thicker layer (no thicker than a business card though!). Nylon doesn’t really like to stick to the build plate so the thicker spread of Elmer’s glue really helped it adhere nicely. It also peeled off beautifully without leaving much residue on the build plate.
Removing half of the Hela headdress base from the build plate
Antlers had to be printed in segments
As I described in my Ironheart article, PCTPE is a bit tougher and normal Dremel sanding bands and grinders couldn’t really cut neatly through the material.
The only thing that worked really well (and efficiently…time is everything!) for me were large diamond coated rotary burrs, which could cut through PCTPE like butter. This saved me a ton of time when it came to cleaning up the details since PCTPE doesn’t print as sharp or clean as other filaments like nGen.
Even though diamond coated rotary burrs sped things up, it was still time consuming since there were so many antlers…
Cleaning up some of the details using diamond coated rotary burrs
Smoothing out some of the more prominent print lines before priming
It’s so satisfying when all the pieces start coming together, especially when the cap slipped perfectly onto Jessica’s head bust.
Again, since PCTPE is semi-rigid, it made fitting the cap a lot easier and probably more comfortable for the wearer.
I also spent some time cleaning up the pieces to ensure a smooth and tight fit between the headdress and the removable antlers.

The Hela headdress cap was also 3D printed in flexible PCTPE
Test fitting the detachable antlers
After a lot more dremeling, I filled problem spots with some flexible filler, sanded, and primed the entire headdress with a high build flexible primer.
And then it was sanding time.
Priming the Hela headdress base halves
And more sanding.
Aaand more sanding.
There was a lot of sanding.
Taking a break
Finally, it was assembly time!
I had to combine the two antler base halves together before I could plant the antler base on the back of the headdress cap.

Of course, the detachable antlers were set aside before securing the antler base to the headdress cap
Attaching the antler base to the cap
Attaching the antlers to the cap
WRONG. DO NOT DO THIS :P
Finally, it was time to airbrush the pearlescent colors.
I was really surprised when I saw Ironhead Studio’s photos of their Hela headdress. In the trailers, you get the impression that her CG antlers are simply black when the real headdress actually had a swirly / shifting mix of pearlescent malachite and black color throughout the antlers.
But since I added all these line details, it didn’t seem like a good idea to try and recreate the swirls since it looked like they’d clash or look too busy.
The final and most satisfying step was sealing the entire piece!
I honestly had a lot of fun sharing my own spin on Hela’s headdress. It was also a great challenge to see how I could re-imagine an already gorgeous piece.
Overall, I hope viewers enjoy this as much as I enjoyed creating it.
I still want to put some LEDs in there though… Enjoy some more pictures below!
<3 Melissa
P.S. Stay tuned! I swear I’ve had other designs in the works. I prefer quality over quantity and I’m sure you’ll love what I have coming up later this year.


Making my interpretation of Marvel’s Ironheart armor for cosplayer Lexi Momo December 3, 2017 16:00
This was commissioned by Marvel and it is also my own interpretation of parts of Ironheart’s armor so please do not ask me to give you my 3D files. This is also a look into my process and NOT a how-to.
Change.
Some people avoid it while others are hungry for it.
Change can either open doors or shut them. It means being uncomfortable or facing the unknown. Change is risky…but so is not changing.
Whether you love or hate change, there’s no doubt that it brings new experiences.
We’ve seen fans love or hate artists for changing their style or trying new things. We’ve also seen fans remain supportive or complain when an artist has a lack of new creations.
I feel lucky that my fans have been really supportive throughout Lumecluster’s evolution. Even though change is always in my future (just not so drastic anymore), I’m still scared every time I branch out and explore. But my bigger fear as an artist is being pigeonholed and not enjoying my work anymore.
So, when Marvel asked me for my interpretation of Ironheart aka Riri Williams (custom designed for cosplayer Lexi Momo) for one of their Marvel Becoming episodes, I was pretty intrigued.
In the Marvel comics, Ironheart’s armor is really sleek. It’s also more sci-fi, which is completely different than my intricately detailed fantasy-focused designs. Even so, I was excited to try something new.
Since we weren’t making the entire Ironheart suit, I used these two images as the main sources of inspiration.
The team behind Ironheart’s Marvel Becoming episode:
- Director: Jason Latorre
- Producer: Judy Stephens
- Cosplayer: Lexi Momo
- Outfit: Lexi Momo
- Armor components: Melissa Ng (Lumecluster)
- Makeup: Lynn Leary
- PA: Chad Kofahl
- PA: Julia Zitzmann
- Studio Manager: Tara Latorre
I was curious to see how well I could apply a Lumecluster aesthetic while still honoring Marvel’s overall Ironheart design. I was itching to see what parts I could tweak or redesign…but I was also really scared.
Scared that viewers would tell me that I’m “not allowed” to make certain changes because of what they’ve seen in the Iron Man movies. Scared that people would tell me that I’m not good at the sci-fi kind of armor and to “just stick with what you’re good at.” Scared that some Marvel fans would tear me apart over why I didn’t do the whole entire suit (ummm…ever heard of budget?).
I was scared that I’d totally fuck it all up.
Comparing Lumecluster’s usual style versus the Marvel’s Ironheart armor style. (LEFT) Photo by A Fleeting Image aka Anshul Mathur www.afleetingimage.com . (RIGHT) Marvel’s The Invincible IronMan cover
Even though I was terrified, my curiosity was stronger. So, I started listing the challenges I might encounter.
The first thing I thought was, “How can I make it so the select armor components won’t look like they can kill her? How can they be more functional?” While the armor in the comics look nice, they didn’t look like they’d properly protect Riri like the armor we’ve seen in the Iron Man movies.
For example, Riri’s gauntlet armor looked like it could cut into her wrist if she flexed it. The spread out plates also gave me the impression that her armor was revealing a lot of vulnerable weak points…
The second challenge was figuring out whether or not we could pull off making a complete enough look while only using a few armor components:
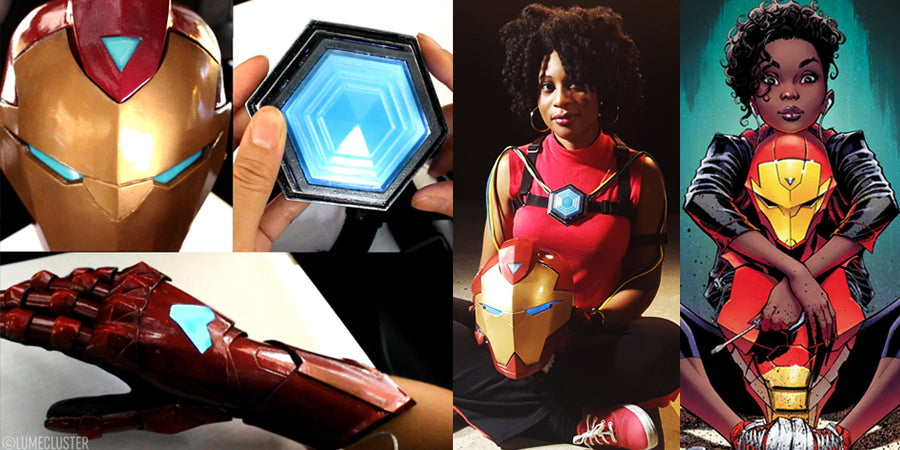
- Helmet
- Gauntlets
- Arc reactor

(TOP LEFT) Ironheart helmet, (TOP RIGHT) arc reactor, (BOTTOM) one of the gauntlets
Some behind-the-scenes random fun shots with Lexi Momo. THE TEAM: Judy Stephens (producer), Jason Latorre (director), Lexi Momo (cosplayer), Melissa Ng (armor components), Lynn Leary (makeup), Chad Kofahl (PA), Julia Zitzmann (PA), Tara Latorre (studio manager).
After considering the challenges, next up was finding the right inspiration.
I decided to go with the idea that Riri Williams was just in the beginning phases of building her Ironheart suit, which would explain why she doesn’t have her entire armor yet.
For the gauntlets, I noticed Iron Man’s suit seemed inspired by historical armor design but it looked too bulky for my taste. I poked around in search of something slimmer and similarly designed to use as inspiration.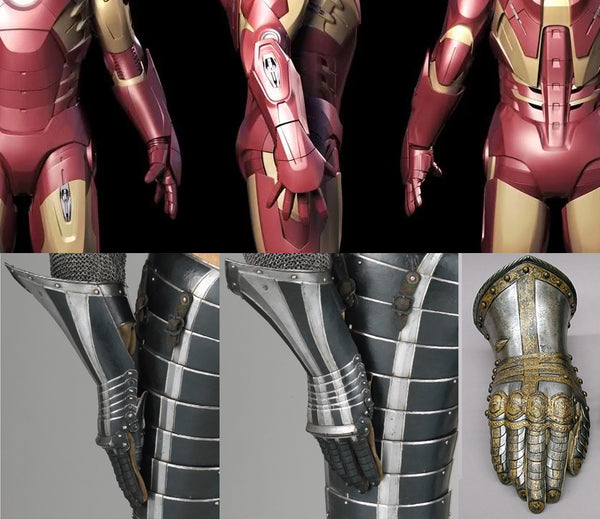
(TOP) Images of one of Marvel’s Ironman suits used as a reference. (BOTTOM) Reference images grabbed from The Met Museum website. Bottom left and middle images are from the black and silver Nuremberg steel infantry armor dated around the 1600s and bottom right image is a gold and silver gauntlet from field armor dated around the 1500s.
Collage of images and screenshots I collected from Marvel’s Ironman movies and concept artwork to use as inspiration.
After searching The Met Museum website, I decided to go with the black and silver Nuremberg steel infantry armor dated around the 1600s and a gold and silver gauntlet from field armor dated around the 1500s, which you can see below. I loved the smooth, simple, and bold design, which I felt matched really well with my Iron Man gauntlet collage.
But I wanted more than just a sleek gauntlet design. I wanted details but I couldn’t go with my usual intricate patterning. So, I decided to try out circuit-inspired patterning instead.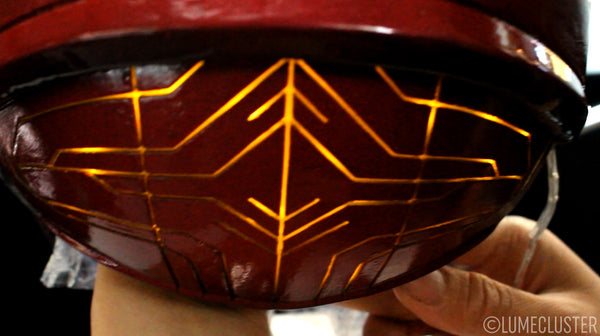
Circuit inspired plate on the back of Ironheart’s helmet. Also visible on Ironheart’s vambrace and helmet comb
he circuit-inspired design, the asymmetrical gauntlets, and the wiring connecting the gauntlets to the arc reactor were meant to imply that Ironheart’s suit is clearly incomplete. But why not also make it look aesthetically pleasing? I mean, just because she’s in her building phase doesn’t mean she has to look like a mess, right?
It also occurred to me that Riri clearly wouldn’t have an arc reactor embedded in her chest like Tony Stark, which meant she needed some kind of harness.
(TOP) Very rough preview of Ironheart’s helmet, arc reactor, and WIP gauntlets. (BOTTOM) Iron Man inspiration from the film.
Making the harness was honestly the least fun part for me, haha. My hope was that the harness and throwing in some wires to connect the gauntlets and arc reactor would be a nice call back to the time when Tony Stark was in his early building / testing phases.
For the helmet, I didn’t want to stray too far from the original design but I added detail on the back of the head plate and extended the comb so I could add glowing details The arc reactor got some simple detailing as well.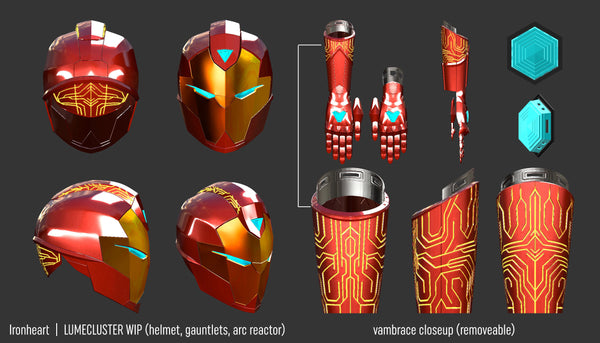
MatCap preview of the Ironheart pieces. Designs were created within a very limited timeframe.
Here is a quick video that gives you a look into some of my process. Or you can also read on and get more detail about what went into Ironheart’s helmet, gauntlet, arc reactor design:
Once all the 3D modeling was done, I could finally start 3D printing my pieces! Yay!
I 3D printed detailed parts like the helmet comb, arc reactor, and vambrace on my Form 2 printer in their standard clear resin. I later molded and cast them in a semi-rigid resin.
Ironheart arc reactor 3D print on the Form 2.
Vambrace design 3D printed on the Form 2.
On my Taz 6, I 3D printed larger or simpler parts like the helmet, arc reactor base, and gauntlet pieces. The helmet was printed in nGen, molded and then cast in a semi-rigid resin.

Part of Ironheart’s helmet being 3D printed on the Taz 6.
Part of Ironheart’s helmet being printed on the Taz 6.
The gauntlets were printed in Taulman 3D’s PCTPE, which is not as neat or sharp as nGen when it comes to printing detail but super tough and semi-rigid (like, I could beat this stuff with a hammer and it would be fine). PCTPE is also a little fickle and prone to a bit of warping, so I decided to avoid printing the helmet in this material since I was working with a very limited time frame and didn’t have time to deal with too many issues.
Pieces printed on my Form 2 were pretty much ready to mold and cast right out of the printer (after some extra UV curing and priming) while prints from my Taz 6 needed some cleanup.
For example, I needed to sand and prime the nGen prints to get rid of print lines. Pretty straightforward.
PCTPE, on the other hand, required a different cleanup approach. Most sandpaper couldn’t really scuff the surface much without a lot of effort. Dremel sanding bands and grinders also couldn’t really cut through the material (not very neatly, at least).
Smoothing out print lines. PCTPE is a bit tough so I had to use diamond dust coated burrs to work faster.
The only thing that worked really well (and efficiently) for me was diamond coated rotary burrs, which could bite through PCTPE beautifully. After some dremeling, I filled problem spots with some flexible filler, sanded, and primed them with a high build flexible primer.
Sanding and filling problem spots on the gauntlets with flexible filler.
Painting and airbrushing is always my favorite part because you can finally start seeing it all really come to life.
Airbrushing Ironheart’s helmet.
First, the glowing circuit patterns had to be masked off with masking fluid. Next, I jumped right into airbrushing with pearlescent paints and sealing it with a flexible finish.
And then came the LED installation.
The LED work here wasn’t anything fancy. I used simple fairy LEDs.
If you want to diffuse fairy LEDs so they don’t look like ugly bright spots, I like to squeeze 2-3 drops of hot glue on some silicone, let it cool a tiny bit, place the LED on top of the glue and then press another piece of silicone on top to make a neat little disk as seen below (this is the same technique I used on my Sovereign Armor LED work).
After the hot glue is completely cooled, I rub or spray on a little white paint so it’s slightly opaque, which improves the diffusion even more. Add 1-2 layers of foam and that’s it.
Simple LED installation.
Ironheart’s arc reactor and harness.
One of Ironheart’s articulated gauntlet gloves.
Ironheart’s comb on the top of the helmet with circuit-inspired patterning.
Ironheart’s vambrace with circuit-inspired patterning.
Assembling the parts!
There was a lot more sewing than I would have liked, especially in the gauntlets. Bleah sewing. Since the gauntlet material was pretty flexible, I decided sewing in the parts instead of using rivets.
Assembling Ironheart’s gauntlet.
Ironheart’s right hand gauntlet. The vambrace is not worn here.
Looking back, there are definitely things I would do differently but, overall, I feel pretty happy about the final result within the limited time frame.
Front of Ironheart’s helmet. LEDs in eyes and forehead are off.
I’m thankful for this opportunity to create something different than what I’m accustomed to because it pushes me to expand my horizons and hone my skills in new ways.
I’ll end this with some more closeup shots of the armor, some behind-the-scenes from the Ironheart shoot below and a final question:
Are you facing any changes or challenges right now that you’re afraid to take on and what’s keeping you from taking the leap?
<3 Melissa
P.S. I had to delay the release of my new armor designs and I can’t say when they’ll be ready. While I hate the delay, I’m happy with the extra prototyping results. I always believe in quality over quantity. Thanks for your understanding and patience. For now, here’s a clip of my most recent prototype

Cosplayer Lexi Momo

Cosplayer Lexi Momo
2016 Year in Review: Growing pains + 2017 Phoenix armor sneak peek December 29, 2016 15:00

It seems appropriate that 2016 is the year I started designing armor because I really needed it.
For those of you who may be new here or don’t know me very well, I like to take on challenges of all sorts. But this year, the challenges were different in that they were very public and often required me to be in front of a lot more people (something I usually like to avoid…).
If you want to learn more about me and how I got to where I am, listen to The Guardian podcast where I chat about how I became a successful 3D printing artist within less than a year.
If 2015 was the year that was all about guarding my solitude and making time to soul search, then 2016 has been all about forcing myself way beyond my comfort zone. Here are my most memorable 2016 moments and what I learned along the way…
Saying “yes” to a new challenge before you’re ready.
Before I started making armor, the biggest thing I made was a mask. So, after I reassured Shapeways (the company I was working with) that I could design the intricate Dreamer Regalia Armor AND document the process all the way to completion, it’s no surprise that I immediately wanted to vomit the moment I left their offices.
For a few days, I was in a panic and tried to come up with reasons to cancel the project (obviously, I didn’t). So, why would I agree to do a project I didn’t feel ready for?
Because growth doesn’t come from waiting around until you know everything.
In the end, that “right moment” doesn’t exist and it will never come. What matters is whether or not you’re willing to take that scary leap into the unknown armed mainly with the determination to fill in those gaping holes of knowledge. And that moment is always going to be uncomfortable.
Dreamer Regalia armor (LEFT) and Sovereign armor (RIGHT) from the Geek & Sundry photoshoots. Photo credit: Eric Anderson
Once I calmed down, I realized that designing the armor was going to be no more difficult than the time I designed my very first mask. Sure, the armor was much larger and more detailed, but I knew I had the ability. Even if I was lacking somewhere, I had no doubt I could find the right resources to help expand my skill set.
After designing the Dreamer Regalia armor, the Sovereign Armor didn’t seem so terrifying. Sure, it was challenging in it’s own way, but my approach was no longer gripped with fear and anxiety.
The beauty of overcoming one major hurdle is that each future hurdle looks less and less intimidating. Before you know it, taking on new challenges becomes addicting.
Knowing the difference between “hating” something vs. avoiding something out of fear.
I used to think I absolutely hated public speaking or anything that involved me being in front of people. I’ve also rarely wore costumes and NEVER wore my own creations. On top of that, I avoided being in photos like the plague. Looking back, I only behaved this way because of my negative experiences while growing up.
The truth is it wasn’t accurate to say that I “hated” things like public speaking. What I actually hated was being mocked and ridiculed.
I honestly didn’t realize it until the beginning of this year, so of course I wanted to give myself a shot. Granted, I had done some smaller speaking engagements beforehand, but the audience was typically small. What better way to test myself and overwrite my past experiences than to accept a speaking engagement at the Animefest convention in Texas? Oh, and how about I wear the Sovereign Armor on the New York Comic Con floor too? Yeah, let’s try that.
It was all terrifying, stressful…but thrilling. I actually enjoyed it.
Aside from meeting amazing people, I learned a lot about where and how I needed to improve myself. But I wouldn’t have discovered this about myself if I didn’t reflect and question the so-called certainties in my life.
Constantly seeking and experimenting with new methods and possibilities.
When I started officially 3D printing art in 2014 and received a strong response to my work, I used to think, “This is it. 3D printing is where it’s gonna be for me.” I didn’t think I’d need to pursue anything else.
While I had a blast breaking into the 3D printing scene and got a surprising amount of recognition and opportunities, I eventually saw 3D printing’s limitations that would prevent me from growing as an artist.
Experimenting with materials and processes.
3D printing is great but it’s not perfect for every scenario. So, I started experimenting with all kinds of other materials like resin, neoprene, silicone, etc. Don’t worry, 3D printing is not out of the picture. It’s just become part of my process. Also, I have my own 3D printer now…so YAY.
Miniature Breakthrough mask printed on the Formlabs Form 2 printer. LOOK AT THOSE THIN DETAILS! D:
In the end, change doesn’t happen by always doing the same thing year after year. Anyway, where’s the excitement in that? Speaking of change…
A peek into 2017: The Phoenix armor and other goodies
I have been expanding and mixing mediums with 3D printing and I’m excited to share where I’ll be going with my new creations. What you’ll see more of:
- Less humanoid masks
- Gauntlets (slightly adjustable and offered in S / M / L)…assuming I get through the tests without a hitch
- Resin jewelry
- Other goodies made via 3D printing + mold making and casting techniques
One of those new mask designs is the “Phoenix” mask/visor, which I first shared in September this year), will showcase the results of my medium experimentation throughout the end 2016.
This is only a quick render of the Phoenix mask and gauntlets.
Phoenix mask WIP. This is not the final product.
Seeing as how Lumecluster became known through 3D printing, I admit I was reluctant to pursue other mediums and mask styles at first. But I realize now that I shouldn’t restrict myself out of fear of what other people think. And honestly, one of the things I hate most is feeling pigeonholed.
So, here’s to a new beginning and rebirth of Lumecluster? I hope you find the change and growth you seek as well! Happy holidays and happy new year!
<3 Melissa